Must-have warframe build examples
In this article we will show you examples of how to build our “must-have warframes” for various purposes and point out what to max to give you some freedom when maxing, allowing you to experiment a bit more on your own if you’d like to :)
Loki Stealth duration build example
For this you want to max your Ability duration (obviously), as well as Ability effiency to easily renew your stealth. Speed modding can help if the goal is to use Loki for missions such as Rescue or Spy where speed can be helpful(!).
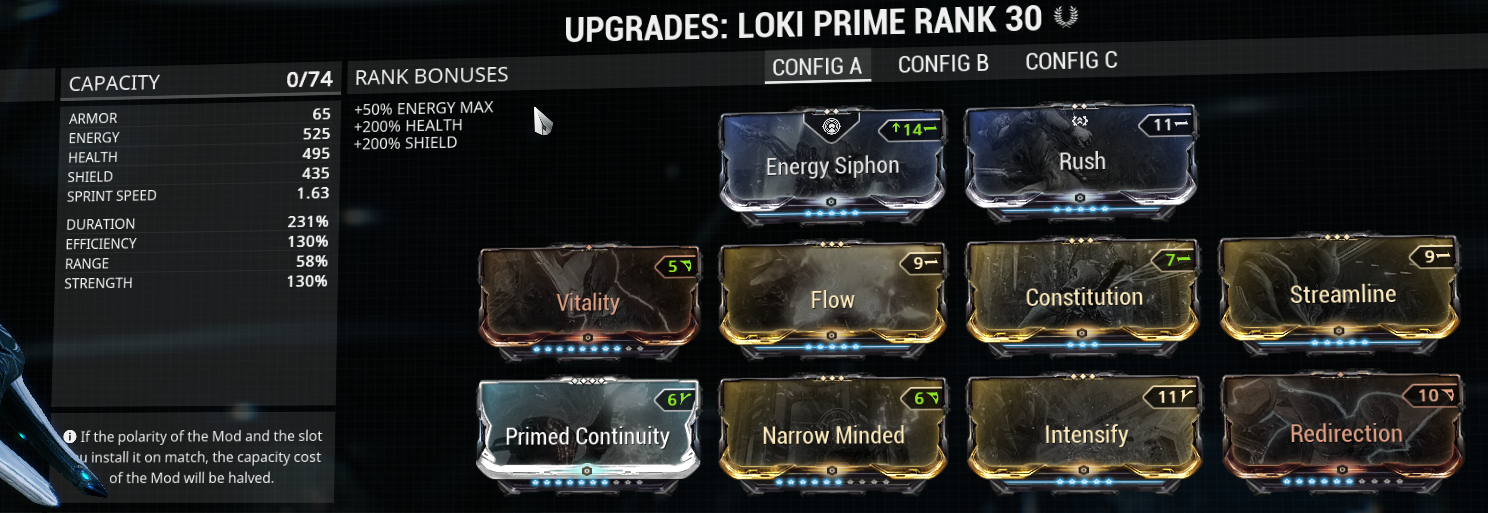
As you can see in this image, I’ve tried to Max duration primary (since invisibility exclusively scales with this) then I have some efficiency. Range and strength won’t really matter.
Vitality and redirection are there for good measure to add some survivability. The Exilus mod “Rush” gives me some pleasant extra movement speed. Energy siphon is a great mod to passively restore energy for the warframe as well as the teammates in groups (they stack if multiple team members have them!). I’ve added constitution primarily for the duration it gives, but also quite nice to have a bit faster knockdown recovery. Flow helps my energy pool stay full enough to last me through missions with ease – together with the little bit of efficiency I’ve got.
To see on the actual abilities what effect these mods have, look below:

Optimal Frost Globe build example (and Freeze Force Buffer Frost build)
Frost is a really nice warframe to have, especially for Mobile defense, defense and excavation missions – to optimize Frost for these missions, you need to optimize Frost’s Snow Globe ability, and this is an example of how I do this:

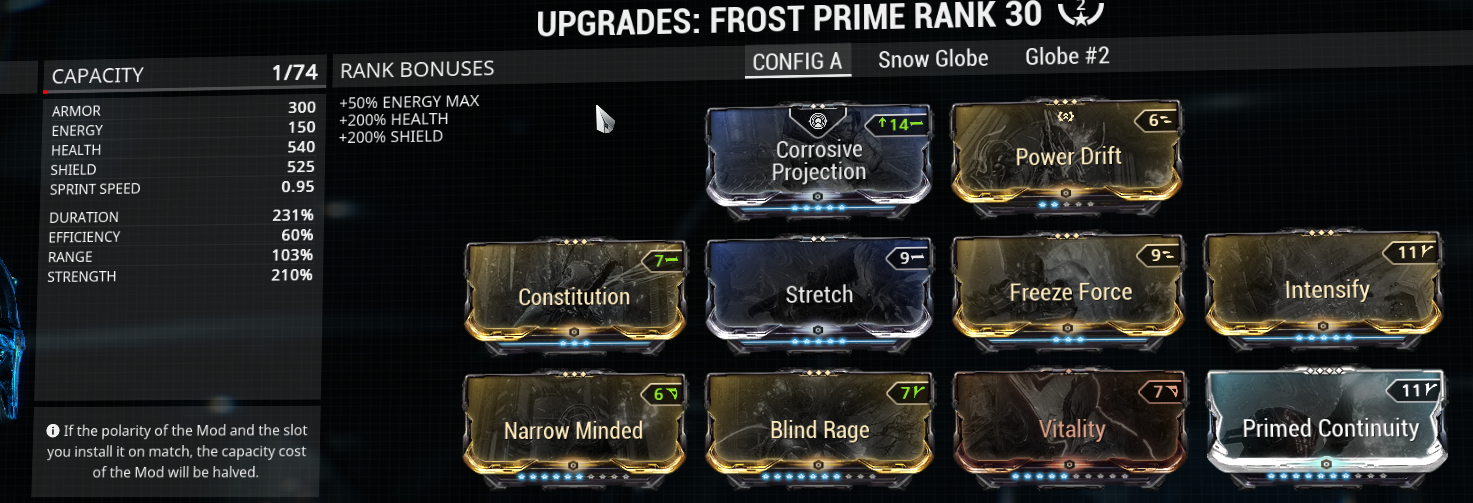
As you can see I need one more Forma to be able to make use of my Exilus mod slot – simply haven’t gotten around to it yet :)
Anyhow you can see how I’m focusing on maxing Strength primarily, then getting a little bit of extra range (not that much more than default needed to be honest) and also a bit of efficiency, whilst the duration will be really low.
This is how the Abilities look with above Globe build:
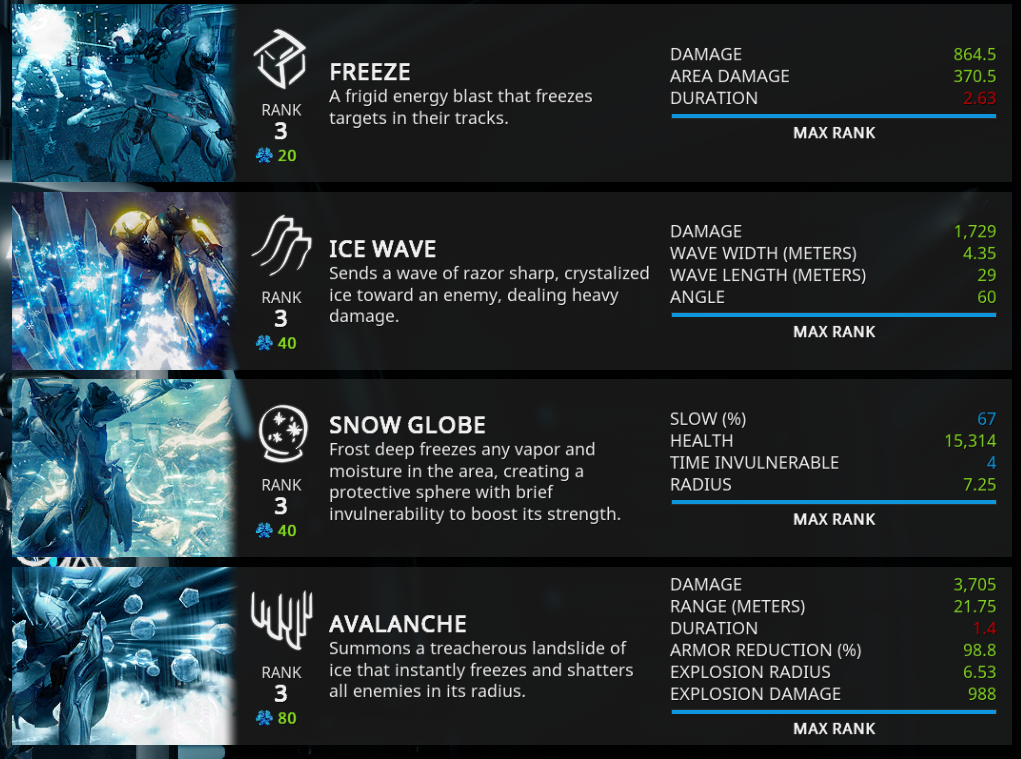
As you can see my Snow Globe health is 15.3k, which is quite high – the health is affected by armor, as well as strength. Hence the Steel Fiber mod that you could see above.
One thing worth remembering for “Globe Frost” and with such a build for him, is that you can actually “stack” your snow globes(!) increasing their health by adding previously replaced snow globe to the newly added snow globe. For example if you stand still in one spot, put up a Snow globe, then right after create another Snow Globe on the same place, the new Snow Globe will have 30k health instead of 15k (unless previous one was damaged) because previous Globe’s health gets transfered into the new Snow Globe – can stack like this up to a maximum health of 1’000’000.
For better understanding of and more insight into Frost’s Snow Globe ability, check out warframe.wikia.com page for Frost.
Buffer Frost (Freeze Force Frost)
There is an alternative build for frost which can be used to turn him into a “Buffer” warframe, which sometimes can be attractive for EXP Farm teams for example. This is done by adding Freeze Force augmentation mod which makes Freeze give +100% Cold damage to allies once they are targeted with Freeze. This buff’s duration can be extended with Ability duration mods as can be seen below.
Here’s how that can look like:
Notice Freeze Force augmentation mod, as well as primary focus is on Extending the duration of the buff that Freeze force provides for our Freeze (adds +100% cold damage to an ally).
Speed build example for Volt for Rush missions
Volt is good for running really fast, and he can do this thanks to his 2nd ability, which is affected by Ability range, Ability duration, Ability strength and Ability Efficiency.
What you usually want to do is to max primarily Ability strength for Speed Multiplier, then you want long duration second so it lasts for a long time. Range is not that important in my opinion, efficiency isn’t really priority over Strength or Duration either I think.
This is how my Speed build for Volt looks like:

As you can see here there are a few changes that should be made that I simply haven’t gotten around to yet – for example the Steel Charge aura mod is pretty “useless” for a Speed build – a better option would be to Forma this slots polarity for Minus (-) Polarity so that I can have Corrosive Projection and Energy Siphon on my Volt Prime which would be way more useful. Another forma would also be required – probably for the Transient Fortitude slot to reduce that pesky mod cost and make room for the last mod of the build to boost stats even further.
I have put on Primed flow and Primed continuity to boost duration as well as provide a satisfactory energy pool that can be filled in start of missions to last for a good while. Knockdown recovery is really sweet to have with super speed let me tell you xD so constitution is very nice – then Rush is there for additional “personal” speed that stacks with the speed buff obviously.
Ability effect of this build can be seen below:
NOTE: Volt can also- much like Frost be turned into a Buffer warframe for EXP farming for example, by purchasing an augmentation mod for his 1st ability giving allies Electricity damage same way Frost Freeze Force gave Cold damage.
Speed Nova and Slow Nova build examples
The thing about turning a regular Nova into a Speed Nova is to get Negative Strength which will reduce the slow% significantly and thereby speed enemies up if the slow% is below 0 (hence negative slow%).
Example of my Speed Nova build below:
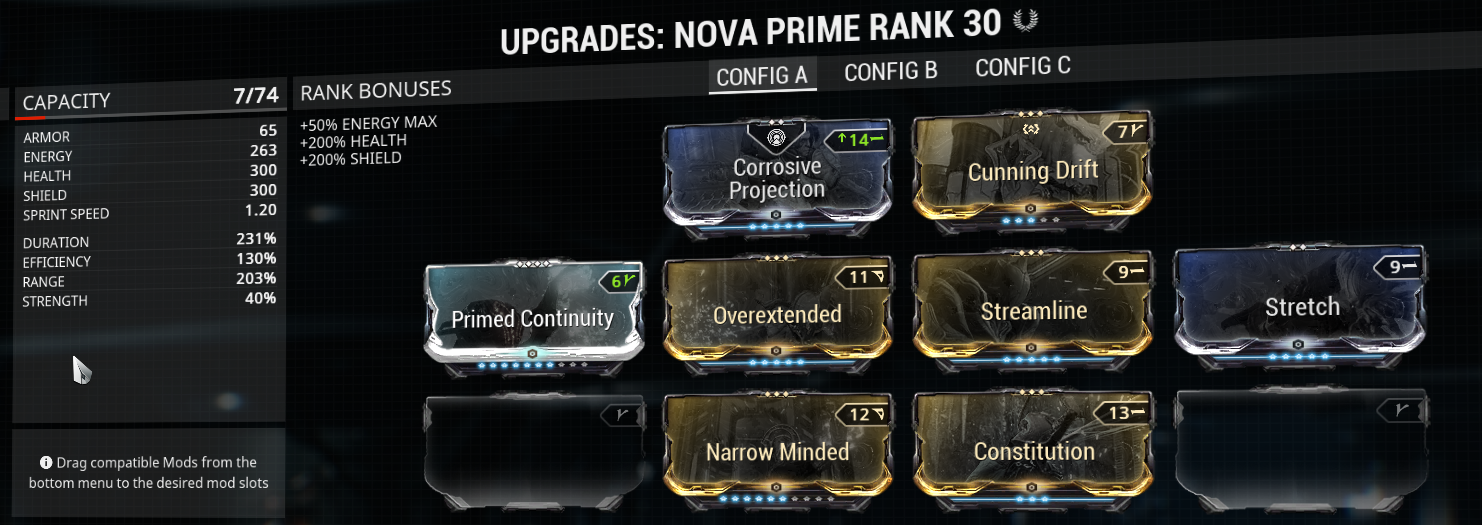
And as you probably can see here as well – more can be done with this – but lack of Formas has stopped me here :) It’s enough for good farm runs though :)
Primary to max should be range and duration, strength needs to be negative as mentioned earlier.
Ability effect for this build looks like so:
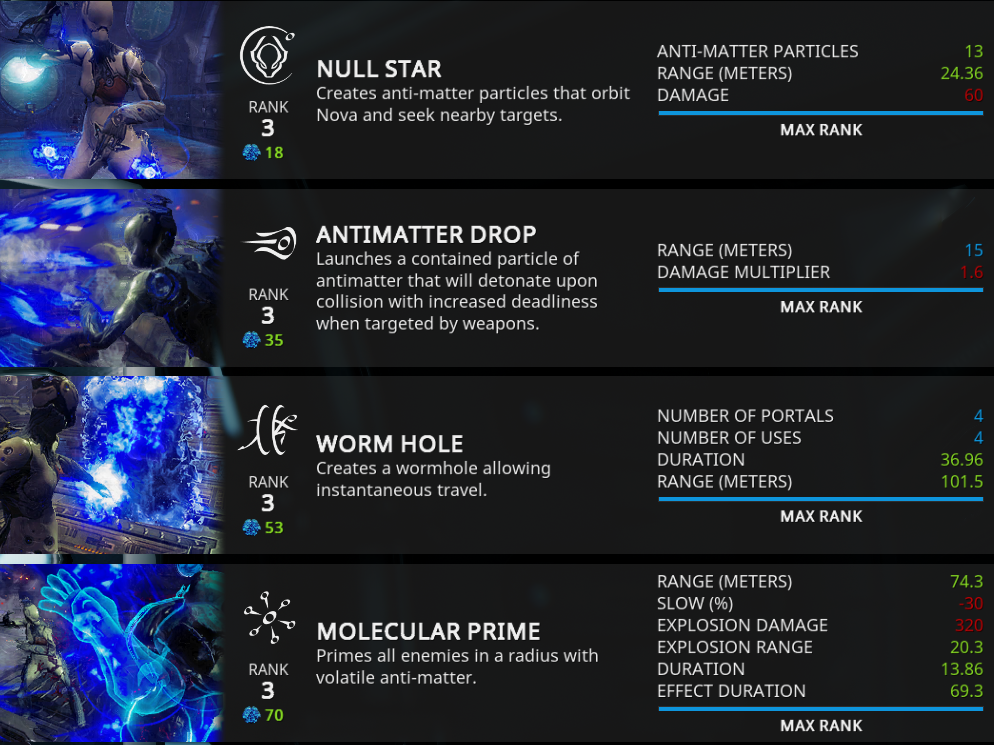
And as you can see the Slow% is -30 which means a Speed up of enemies by at least 30%. When playing Speed Nova in farm runs – make sure to “renew” the Molecular prime everytime your duration runs out – because even if the effects last for so much longer, new enemies will not have this effect that have spawned AFTER you used your ability :)
For Slow Nova things are a bit different – no more need for negative strength, but instead we want to max strength and duration as well as range.
My build example can be seen below:
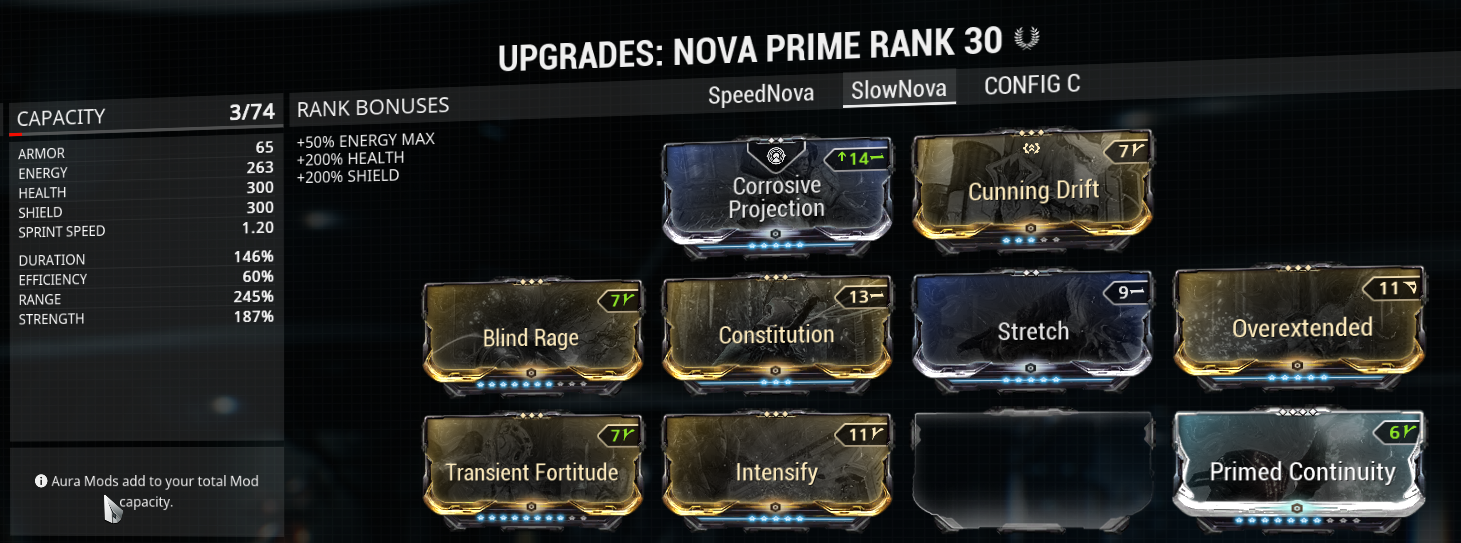
Could’ve used more Forma for this build as well since there are empty mod slots available :P
And the effect of this on the Molecular prime is as follows:

Here you can see the slow% is now at 75% instead of -30% like for speed nova, so enemies will be quite slow with this build. So when is it useful to have a slow nova? Well for example when survival missions gets to have High-level enemies and you need to slow them down to stay in it or in general increase survivability by making enemies slower(!).
EV Trinity build example (as well as Tank Trinity build example)
EV used to be my main warframe that I played most – so for this one I actually have completed a forma build :P This build and warframe got me through many Draco runs back in the day for massive EXP farms.
Alright, so a quick introduction to how you build EV trinity, is basically you want as low duration as possible(!) whilst having High Ability strength. This is so that your high Ability Strength gives a lot of Energy when using Energy vampire – and the low duration makes it so that all of that Energy the Strength helped boost – will be as quickly as possible, instead of being dragged out over a longer duration. Shorter duration is best because it’s like an Instant Full energy refill for your teammates the lower duration you’ve got.
You preferably also want to have the Trinity augmentation mod Vampire Leech which will Overheal shields once players Energy cap is filled to the max – together with low duration and high ability strength this will result in massive so called “overshields” that increase your teams overall survivability (overshields are purple instead of blue color).
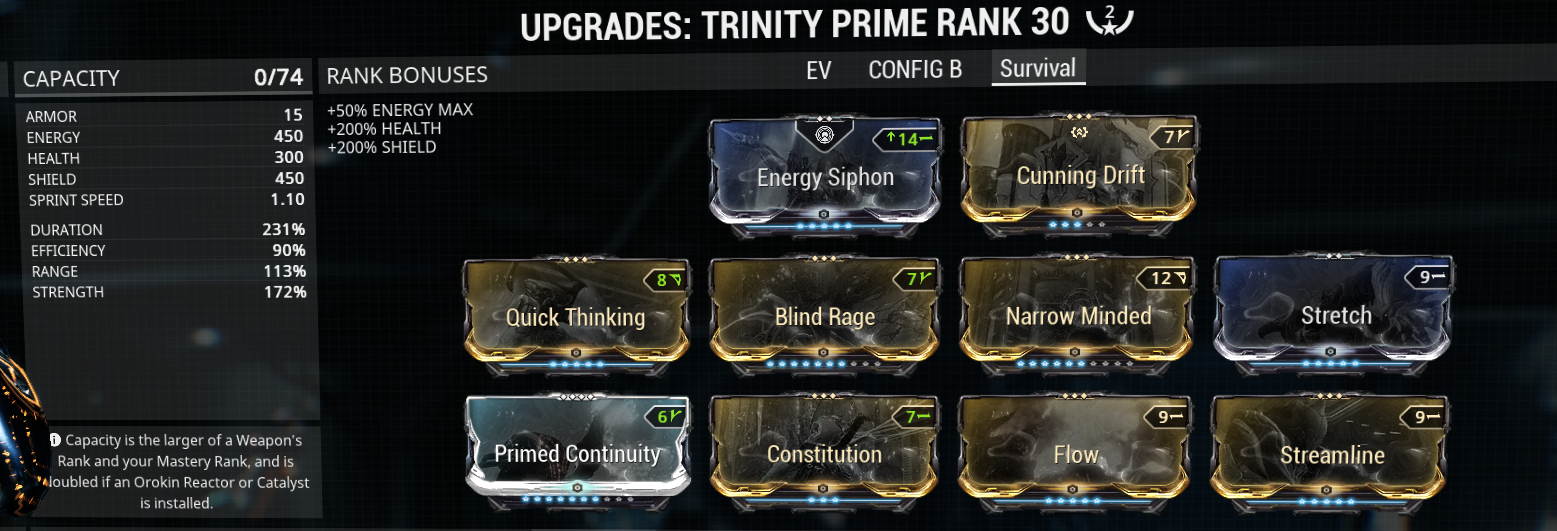
My EV build below:
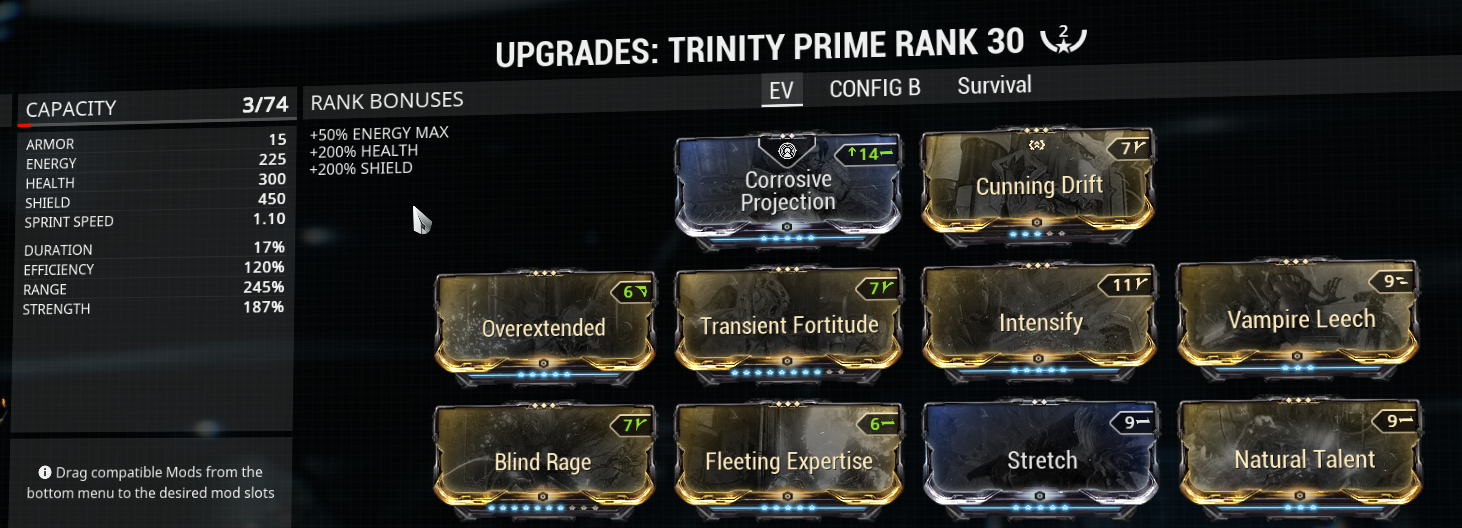
As you can see my duration is super low coupled with max range – and decent strength – range is probably more important than strength, since you want as many as possible – no matter how far from you they might be – to get refilled energy so the team can keep going doing whatever you guys are doing :)
My Trinitys Abilitys becomes like so from this build:
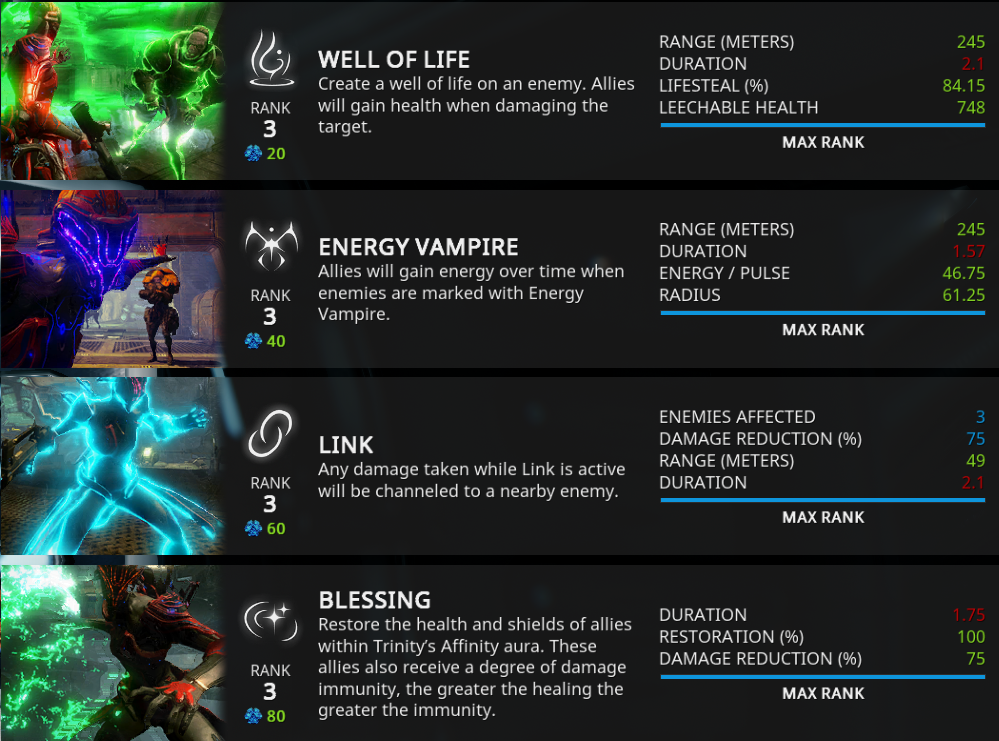
And as you can see my Energy Vampire ability reaches 245 meters which is quite long distance – which is also helpful (to target someone to become energy refill station), together with almost 1 second duration only and pulsates for 47 energy per pulse and pulsates 4 times at max level. And it has a radius of pulses to affect players for almost 62 meters, also quite a lot :)
While using EV ability on enemy, they get Crowd Controlled and cannot do anything for the time of the EV ability – this can be good to use on large and/or difficult enemy units because of this to ease the fighting by taking those units out of the equation for a short interval. While pulsing energy to allies, the targeted EV’d enemy unit takes damage – which is Finisher damage (ignores Shields and armor).
If you kill the target affected by Energy Vampire – all of the energy pulses will be released at once(!) giving a burst of energy for (in my case) 47*4=188 Energy instantly! (since 4 pulses).
As you can see on my build above I also have a mod called “Natural Talent” this mod reduces my cast time, making it way smoother and easier to re-cast my EV on same- or other targets to make the entire process of being an EV trinity Way easier and more efficient :D!
A very nice TIP for when playing EV Trinity is to make sure your “team portraits” is activated so you can see peoples Health as well as Energy levels – helpful to know when people need more of it. You can activate these portraits by clicking “Z” on PC by default – and the portraits will appear on the right side of the screen.
Alternative Trinity build – Tank Trinity
For Tank trinity, you want to max Duration and Strength – this to empower Trinitys ultimate (4th ability) which gives Damage reduction for a duration (+ it instantly restores health and shields), as well as Trinitys 3rd ability which binds her to nearby enemy units – redirecting damage taken to the enemies increasing survivability.
See build example below:
And how her abilitys are affected with such a build:

Regular (energy) and Despoil (health) Desecration Nekros build examples
Most popular build for Nekros Desecration (his 3rd ability – now passive, used to be an active ability to spam) is draining Health instead of Energy, since desecrate will grant extra health orbs when desecrating enemy corpses, I will try and demonstrate both of these builds in this example, basic idea behind the regular (energy) desecrate build is to have a lot of efficiency and max range – duration won’t do anything, neither will Ability strength. Whilst for the Despoil desecrate Nekros build, you will drain health instead of energy desecrating which means it’s improtant to have Vitality mod for health – perhaps health conversion mod for +450 armor that stacks up to 3 times when picking up health orbs to make you tankier (desecrate makes it rain health orbs – Imagine yourself with a constant 1350+ armor xD).
The general key to desecrate builds is that it’s important to focus on Ability efficiency, as well as Ability Range.
See my Energy nekros build below:

Notice primed continuity – this can be replaced really with whatever mod you want – it doesn’t really serve a purpose, I just have it here to try and balance up the otherwise very negative duration I would get without it – so that my ultimate if I ever need to use it for some survivability it will last a fairly decent duration and not just disappear right away.
Notice also Equilibrium, on health orb pickups this grants energy, which we will get a lot of using desecrate, and thereby help sustain our desecrate (in theory at least not tested it yet), and on energy orb pickups we will get health with it- which doesn’t exactly hurt either :)
And the Ability effects:

And for the Despoil Nekros build:
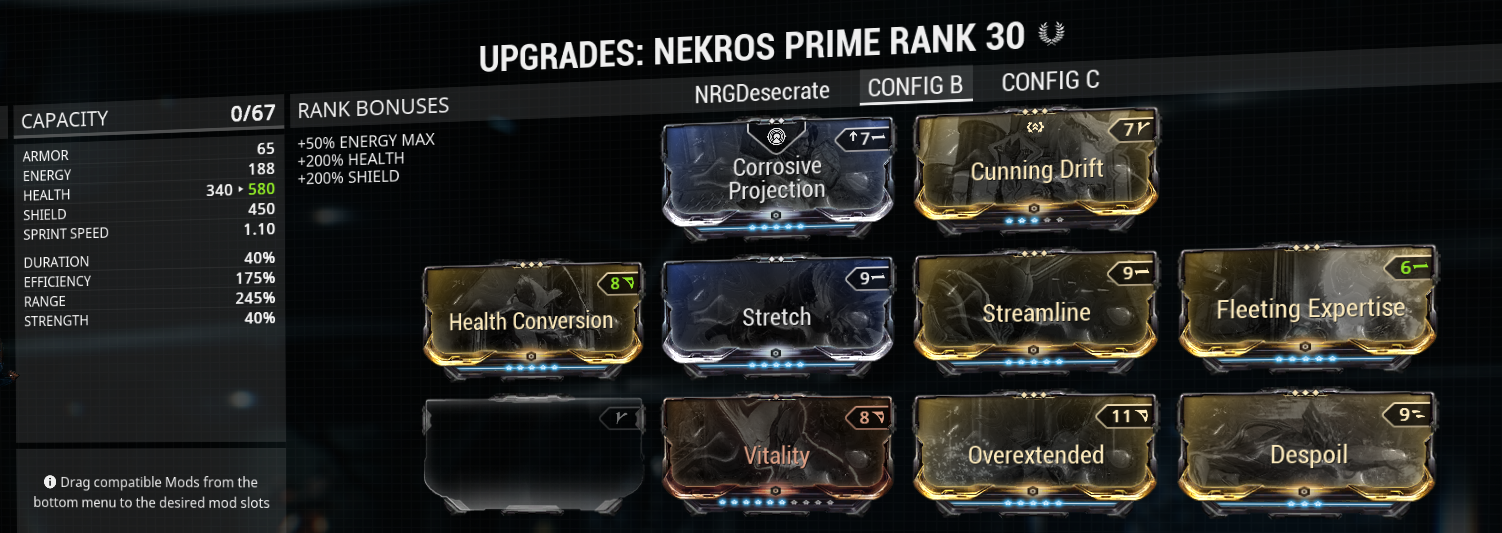
Health conversion is a at the time of writing this article- a 50 platinum mod on warframe.market but is really quite good for survivability – notice the lack of both flow and continuity in this build – flow won’t be needed since we will be draining health to sustain our desecrate ability, and continuity, well f*** it xD Health conversion will make us tanky together witih Vitality to help sustain our health drainage better. No need then for stabilizing duration for our ultimate to help out in a pinch, health conversion will do this for us instead :)
And for the Ability effects of this build:

As you can see it says still energy/enemy in cost, but since we got despoil mod on, this will be health/enemy instead.
Pilfering Swarm Hydroid (Pilfdroid) build example (after rework)
For Pilfdroid it is important (after the rework) to prioritize maxing out Ability strength, then you might want to secondarily prioritize duration and the efficiency is not that important, nor is the range – but can be a bit helpful with some additional range though (to balance up to around 100%).
See my build example below:
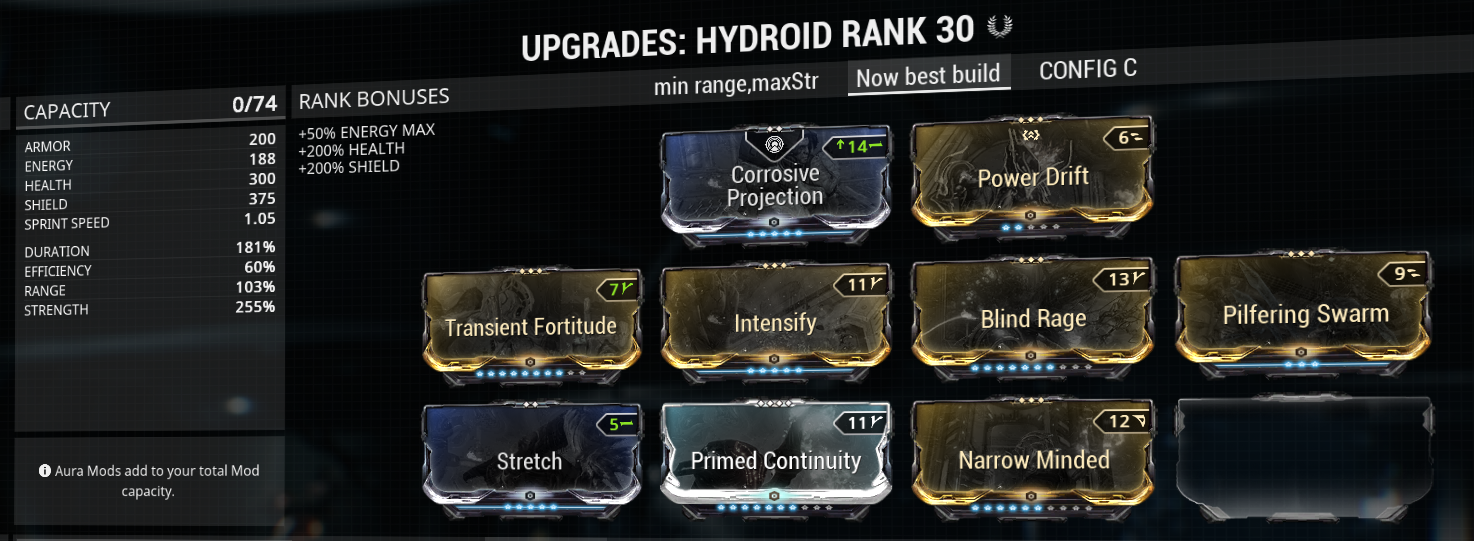
As you can see my efficiency is low, which means Tentacle Swarm will cost quite a bit of energy to execute, but this is Okay for me since my duration is so long – it will cancel each other out quite nicely. I have maxed strength and compensated up so I am around 100% range as well which is very nice in-game I can vouch for :)
Pilfering Swarm mod is a Must-have because this is what gives your Tentacle Swarm +100% additional drops on tentacle swarm kill.
Ability effects from this build as follows:
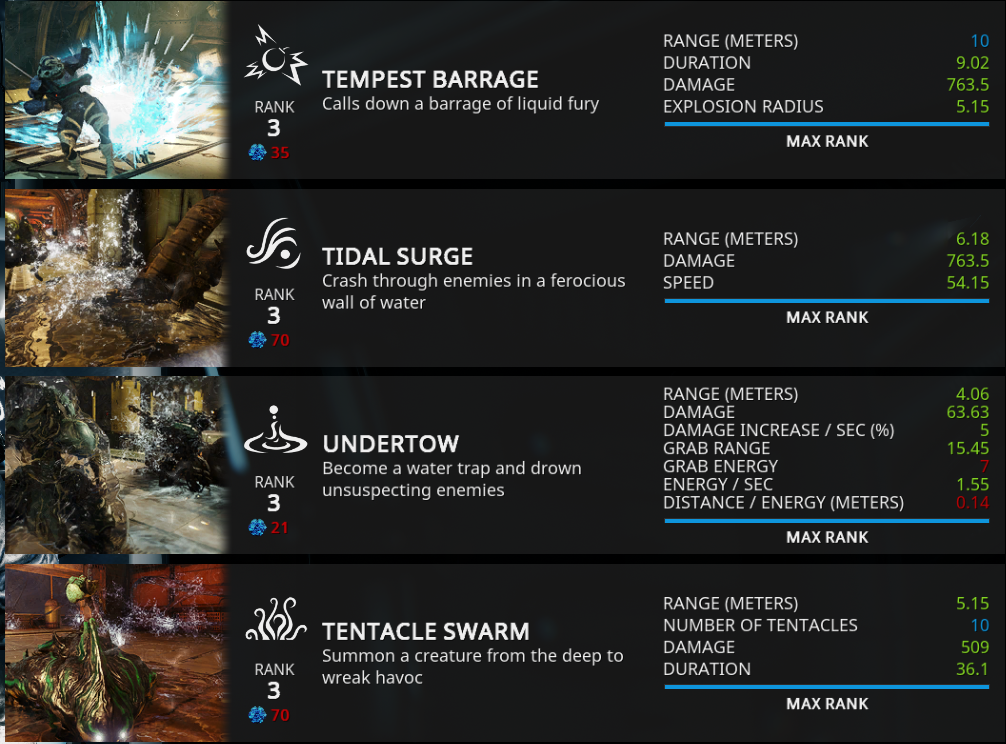
And as you can see here 36 seconds duration is quite nice. And to make it a bit clearer exactly how hydroid works, I’ll explain it – basically he summons 10 tentacles at level 30 (on instant cast), on summoning them they do 300 magnetic damage when contact with enemies first time, after that they do 200 base finisher damage PER SECOND to enemies. And one tentacle can hold one enemy at a time until they are dead to continue to another enemy. And to help give even more understanding of the type of damage Hydroid deals with his tentacles – finisher damage ignores armor and shields and goes directly to health.
And you can either cast the ability directly, or you can hold it down for 2.5 seconds charging it up– making it become more powerful. Charging it up to 2.5 seconds increase amount of tentacles to 20 and increasing their radius with 300% whilst doubling energy cost for the ability.
Another tidbit of interesting information concerning hydroid and his tentacle swarm is that if you cast it while you are in your “Undertow” ability, your magnetic damage as well as finisher damage will be boosted with 200%(!).
For even more detailed information about hydroid and how his Tentacle Swarm works, check out the warframe.wikia.com.
Credit farming Chroma build example
What you want to do for a Creding farming opt Chroma build is to Maximize strength so enemies die fast, as well as efficiency AND duration(!) because summoning Chroma’s Effigy which is the sentry to deal damage in order for additional credit drops- drains quite a bit of energy and the drainage is affected by both efficiency as well as duration!
See my build example below:

This build is not yet finished however – optimally I wanted to add a Constitution mod to it as well, but this would require one or two formas – Steel fiber is only there to increase the already high base armor (most effective on warframes with high base armor) and also is here because the mod capacity was not enough to add constitution even without Steel Fiber.
Constitution mod would’ve added an additional +28% duration which would’ve helped out with sustain for the energy drain for having the Chroma sentry summoned.
Ability effect below:
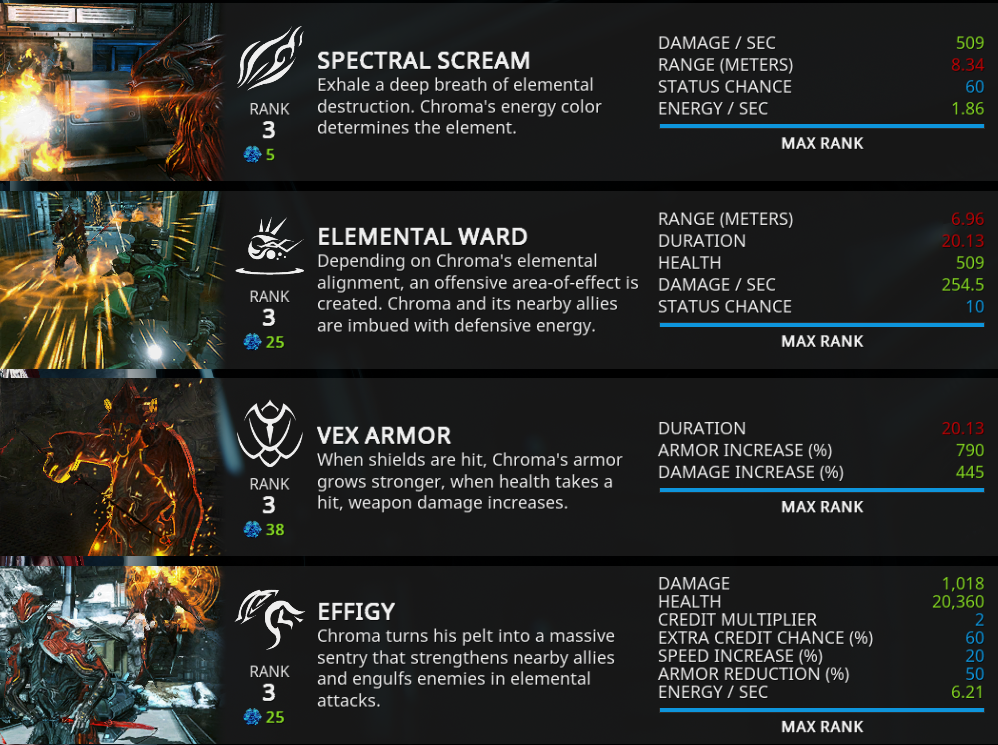
As you can see Strength helped empower the Effigy Health to 20k+, damage is over 1000 which is good, energy/sec is manageable thanks to us using both Efficiency and Duration mods to reduce it.
Credit chance and multiplier cannot be affected with mods, neither can the range (hence why we simply ignored the range with this build :))
EXTRA: Buffer Rhino build example (because he is really good buffer)
Basically as a buffer you want to max Ability strength, as well as duration and efficiency – range doesn’t really matter that much.
Rhino is a good buffer because his Roar ability increase damage from all sources and scales with both Ability strength as well as Ability duration.
See my build example below:
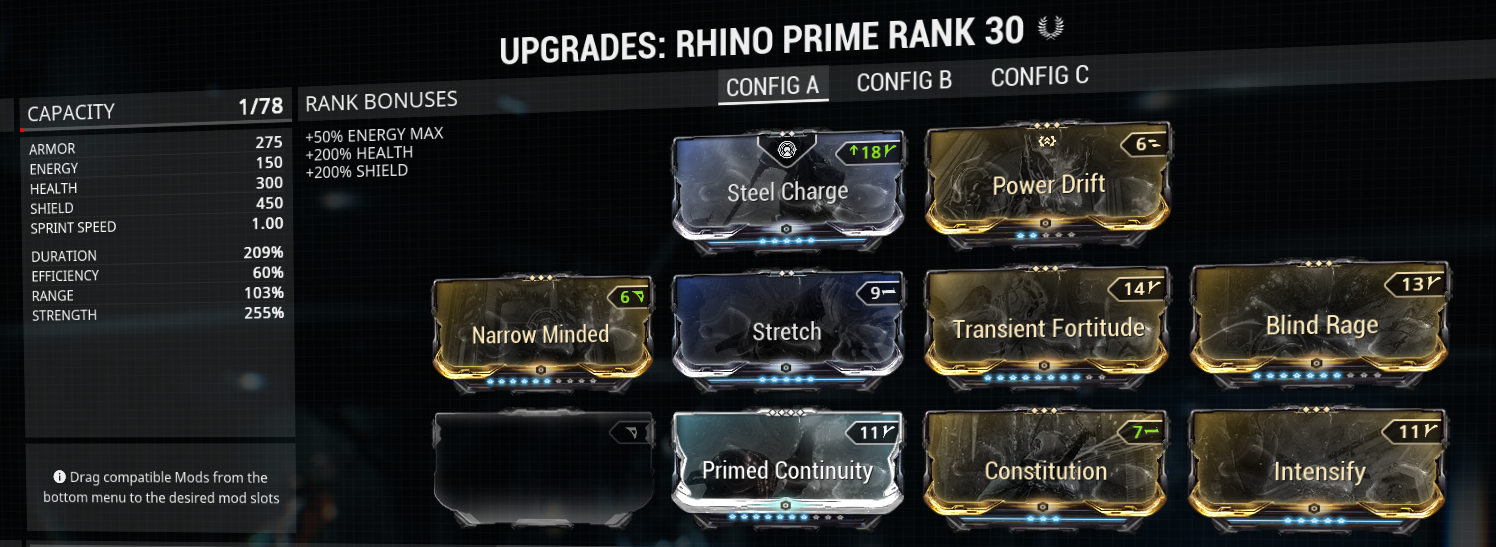
As you can see on this build same as for example the Chroma- a Forma would be required to alter the Aura mod for more optimal modding – such as Minus (-) Polarity to have energy siphon or better yet – Corrosive Projection which stacks with other teammates and become really useful in teams.
Ability effect below:
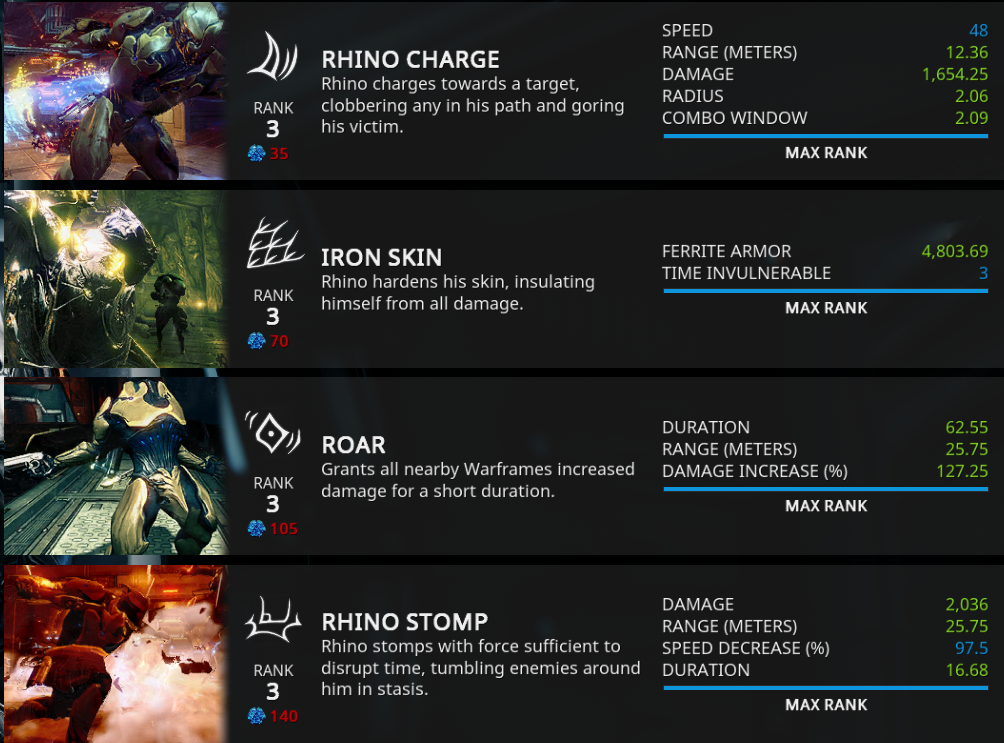
As you can see here my Roar give+127.25% Damage increase as a buff and lasts for a little over 1 minute and has decent range :)
Enjoy the builds everyone :D